Introduction:
Authentication and providing secure access to users is an integral part of any web application. We can either build it on our own or use a third-party service such as the Microsoft Authentication Library (MSAL). This not only saves development effort and resources but also provides us with a reliable, efficient, and time-tested solution. MSAL provides secure access to web applications or Rest APIs. It supports many different application architectures and platforms like Javascript, Java, Python. There is no need to use OAuth libraries as MSAL can be integrated using configuration file and some code. Application can sign in users with Microsoft personal account or users set up in cloud. An added advantage would be the reliability of Microsoft for user’s data security and scalability.
So let us dive in straight away and look at the steps required to implement it, which is as follows -
- Register application in Microsoft Azure Platform
- Configure Auth Config file
- Add MSAL code to application
- Add Sign-In component
- Integrate Sign-In with application
- Access protected Rest APIs
1. Register application in Microsoft Azure Platform
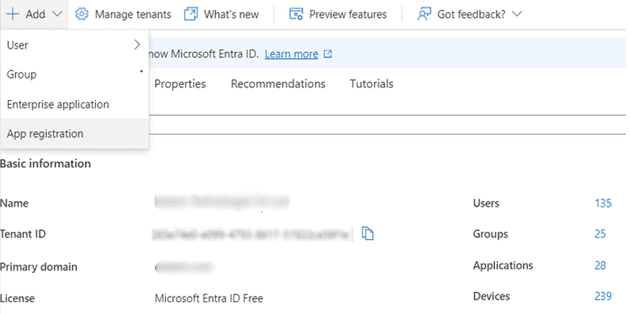
First, we need to have an Azure Subscription or a free Azure account. The account must have permissions to register an application. From the Home page, we can select the service Microsoft Entra ID. Here we can view the Tenant Id of the account and add a new App Registration.
The Tenant Id will be required while setting up the Auth Config file.
We can enter Application Name and a Redirect URI for the application. Redirect URI is the home page of the application or the page where MSAL should redirect to after successful authentication.
After we click on the Register button, we will get an Application Id for the application.
Now that we have the Tenant Id and Application Id, we can proceed with creating the Auth Config file
2. Auth Config File
Within the src folder of the application we can add an authConfig file which contains the configuration that will be passed on to Msal instance on creation. A typical authConfig file will appear as below.
 // Code snippet 1 – src/authConfig.js
export const msalConfig = {
    auth: {
        clientId: 'applicationId',
        authority: 'https://login.microsoftonline.com/tenantId',
        redirectUri: 'https://dev-example-app.com/',
    },
    cache: {
        cacheLocation: 'sessionStorage', // This configures where your cache   will be stored
        storeAuthStateInCookie: false, // Set this to "true" if you are having issues on IE11 or Edge
    }
};
/** Scopes you add here will be prompted for user consent during sign-in.
 * By default, MSAL.js will add OIDC scopes (openid, profile, email) to any login request.
 */
export const loginRequest = {
    scopes: ['User.Read']
};
3. Add MSAL code to the application
We need to install the packages @azure/msal-browser and @azure/msal-react.
// Code snippet 2 - terminal
npm i @azure/msal-browser @azure/msal-react
At the entry point of the application, we can initialize the PublicClientApplication object and wrap the application within the MsalProvider component.
 // Code snippet 3 – src/index.js
import ReactDOM from 'react-dom/client';
import { PublicClientApplication } from "@azure/msal-browser";
import { MsalProvider } from "@azure/msal-react";
import { msalConfig } from "./authConfig";
import App from './App';

const root = ReactDOM.createRoot(document.getElementById('root'));
const msalInstance = new PublicClientApplication(msalConfig);

root.render(
<MsalProvider instance={msalInstance}>
   <App />
</MsalProvider>
);
4. Sign-In component
Here, we must import loginRequest from the authConfig file and provide it to the Msal instance. Depending on whether we want to add Sign-In as a page or a popup, we can use the loginRedirect or the loginPopup function.
 // Code snippet 4  - src/components/SignIn.js
import { useMsal } from '@azure/msal-react';
import { loginRequest } from '../../authConfig';
const SignIn = () => {
  const { instance } = useMsal();
  const handleLogin = () => {
    instance.loginRedirect(loginRequest).catch((e) => {
       console.log(e);
  };
  return (
    <SignInContainer>
      <SignInPageComponents />
      <SignInButton onClick={() => handleLogin()}>
         Sign in Using Microsoft
      </SignInButton>
    </SignInContainer>
  );
}
export default SignIn;
In case Sign-In is a pop, Msal instance will use the loginPopup function .
// Code snippet 5  - src/components/SignIn.js
instance.loginPopup(loginRequest).catch((e) => {console.log(e)});
Similarly, Sign-Out can be handled by logoutRedirect or the logoutPopup functions.
// Code snippet 6  - src/components/SignOut.js
instance.logoutRedirect({
  postLogoutRedirectUri: "/",
});
// Code snippet 7 - src/components/SignOut.js
instance.logoutPopup({
postLogoutRedirectUri: "/",
mainWindowRedirectUri: "/",
});5. Integrate Sign-In page with application
After clicking on the Sign-In button, MSAL will authenticate user. Application can use the useIsAuthenticated function to find out whether authentication succeeded. Also, useMsal returns three objects, instance, inProgress and accounts. The accounts object contains the authenticated user’s details.
// Code snippet 8 - src/App.js
import { useMsal, useIsAuthenticated } from '@azure/msal-react';
import Header from './components/header';
import SignIn from './components/signin';
import Home from './pages/home';

const App = () => {
    const isAuthenticated = useIsAuthenticated();
    const { accounts } = useMsal ();

    useEffect(() => {
        if (accounts.length > 0) {
            sessionStorage.setItem('user-details', JSON.stringify({
                name: accounts.length > 0 && accounts[0].name,
                email: accounts.length > 0 && accounts[0].username
            }));
        }
    }, [accounts]);

    return (
        <div>
            { isAuthenticated ? (
                <>
                    <Header
                        name={accounts.length > 0 && accounts[0].name}
                        email={accounts.length > 0 && accounts[0].username}
                    />
                    <Home />
                </> ) : ( <SignIn /> )
            }
        </div>
    );
}
export default App;
There is one more way this can be done. Instead of using the useIsAuthenticated function, we can use the AuthenticatedTemplate and UnauthenticatedTemplate components. Components wrapped within AuthenticatedTemplate will be rendered only if authentication is successful.
// Code snippet 9  - src/App.js

import { useMsal, AuthenticatedTemplate, UnauthenticatedTemplate } from '@azure/msal-react';
. . . . (same as previous code)
return (
    <div>
      <AuthenticatedTemplate>
          <Header
             name={accounts.length > 0 && accounts[0].name}
             email={accounts.length > 0 && accounts[0].username}
          />
          <Home />
      </AuthenticatedTemplate>
      <UnauthenticatedTemplate>
          <SignIn />
      <UnauthenticatedTemplate>
    </div>
   );
Additionally, we can also use inProgress to display a loader during authentication
// Code snippet 10 - src/components/AnyComponent.js

const { inProgress } = useMsal();

return inProgress ? <Loader /> : <Component/>;
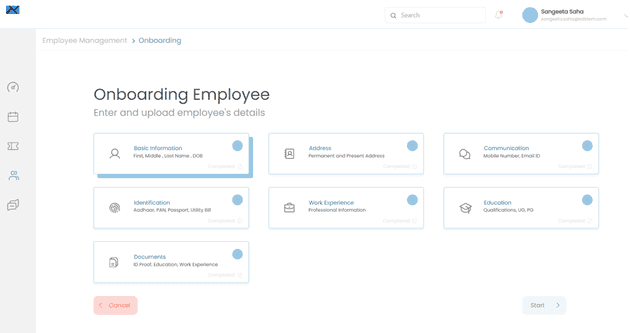
Following images show the running of the application
6. Accessing protected Rest APIs
Applications can also access protected Rest APIs using any of the acquireToken* methods.
// Code snippet 11  - src/components/AnyComponent.js
import { InteractionRequiredAuthError, InteractionStatus} from "@azure/msal-browser";
import { useMsal } from "@azure/msal-react";
const AnyComponent = () => {
  const { instance, inProgress, accounts } = useMsal();
  useEffect(() => {
    const accessTokenRequest = {
      scopes: ["user.read"],
      account: accounts[0],
    };
    if (!apiData && inProgress === InteractionStatus.None) {
      instance
        .acquireTokenSilent(accessTokenRequest)
        .then((accessTokenResponse) => {
          let accessToken = accessTokenResponse.accessToken;
          callApi(accessToken).then((response) => {
            // process the response data
          });
        })
        .catch((error) => {
          if (error instanceof InteractionRequiredAuthError) {
          instance.acquireTokenRedirect(accessTokenRequest);
          // OR  instance.acquireTokenPopup(accessTokenRequest)
          }
        });
    }
  }, [instance, accounts, inProgress]);
return (...)
}
export default AnyComponent;
The API endpoint is called by passing the access token as Bearer Token.
// Code snippet 12
const callApi = async (accessToken) => {
  try {
    return await axios.method(endPoint, {
      headers: { Authorization: `Bearer ${accessToken }` });
  } catch (error) {
    return error.response;
  }
};
Conclusion
In this article we have gone through registering the application, creating a configuration file and the different ways in which Sign-In and Sign-Out can be implemented and integrated with the application. Additionally, we can also access protected APIs using MSAL. Consider a scenario where in, a new employee joining an organization need only create a Microsoft account. Using this, the employee can access Outlook as well as the organization's internal applications. So, once they are logged in, they can seamlessly navigate through creating a techdesk ticket, logging timesheets, viewing project details, and sending emails. Also, from the administrative point of view, managing and monitoring users becomes easier.
Hope you have found this article informative and can use it in your project as required. Thanks for reading!


